Drupal continuous integration
View the Project on GitHub atouchard/drupal-continuous-integration
TweetThis project is a fork of Template for Jenkins Jobs for PHP Projects by Sebastian Bergmann suitable for Drupal.
Below, you can watch a typical architecture for continuous integration :
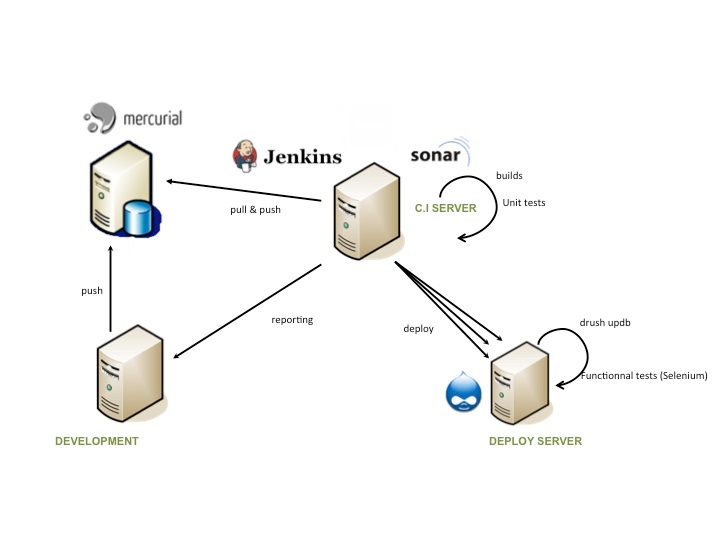
The basic tools are :
Ant is used to manage tasks, you can also used Maven, Phing, ...
- build.xml : default project (adapted from jenkins-php) launches common tasks.
- nightbuild.xml : deploy application on a remote server and launch Selenium tests.
Note :
If you run PHP under 5.3, you need specific versions of PEAR plugins and use Doxygen for documentation with the help of Matt Farina instead of phpdox (PHP 5.3).
For all your Drupal projects, you don't need to test Drupal Core and contrib modules, just your modules and your themes.
The default configuration analyzes custom code in src/sites/all/modules/custom and src/sites/all/themes folders. You can change these paths in properties/build.properties
PEAR
To start, this is a typical installation for PEAR :
pear config-create ~/ .pearrc
mkdir -p ~/pear/lib
vi .bashrc
     PATH=$HOME/pear:$PATH
     export PATH
pear install -o PEAR
Next, add channels and install PEAR package (All of your packages will go under the ~/pear folder).
Channel subscriptions
pear channel-update pear.php.net
pear upgrade-all
pear channel-discover pear.pdepend.org
pear channel-discover pear.phpmd.org
pear channel-discover pear.phpunit.de
pear channel-discover components.ez.no
pear channel-discover pear.symfony-project.com
Install plugins
pear install channel://pear.php.net/Net_URL2-0.3.1
pear install channel://pear.php.net/HTTP_Request2-2.0.0RC1
pear install --alldeps pdepend/PHP_Depend
pear install --alldeps phpmd/PHP_PMD
pear install phpunit/phpcpd-1.3.1
pear install --alldeps phpunit/phploc
pear install --alldeps PHP_CodeSniffer
pear install --alldeps phpunit/PHP_CodeBrowser
pear install phpunit/PHPUnit-3.5.5
You can view all plugins informations at phpqatools.org
JENKINS
To install Jenkins, go to the Jenkins website, download application and follow the instructions.
For example, on Ubuntu/Debian :
wget -q -O - http://pkg.jenkins-ci.org/debian/jenkins-ci.org.key | sudo apt-key add -
deb http://pkg.jenkins-ci.org/debian binary/
sudo apt-get update
sudo apt-get install jenkins
sudo sh -c 'echo deb http://pkg.jenkins-ci.org/debian binary/ > /etc/apt/sources.list.d/jenkins.list'
sudo aptitude update
sudo aptitude install jenkins
Then, run Jenkins on a specific port (--httpPort) if you want :
nohup java -jar jenkins.war --httpPort=2000 > ~/logs/jenkins.log 2>&1By default, Jenkins run on port 8080.
You can start Jenkins with other command line parameters.
Go to http://127.0.0.1:2000 to see Jenkins alive.
You can use Jenkins client to download plugins easily :
wget http://127.0.0.1:2000/jnlpJars/jenkins-cli.jarNow, install Jenkins useful plugins :
java -jar jenkins-cli.jar -s http://127.0.0.1:2000 install-plugin checkstyle
java -jar jenkins-cli.jar -s http://127.0.0.1:2000 install-plugin cloverphp
java -jar jenkins-cli.jar -s http://127.0.0.1:2000 install-plugin dry
java -jar jenkins-cli.jar -s http://127.0.0.1:2000 install-plugin htmlpublisher
java -jar jenkins-cli.jar -s http://127.0.0.1:2000 install-plugin jdepend
java -jar jenkins-cli.jar -s http://127.0.0.1:2000 install-plugin plot
java -jar jenkins-cli.jar -s http://127.0.0.1:2000 install-plugin pmd
java -jar jenkins-cli.jar -s http://127.0.0.1:2000 install-plugin violations
java -jar jenkins-cli.jar -s http://127.0.0.1:2000 install-plugin xunit
Then, restart Jenkins safely :
java -jar jenkins-cli.jar -s http://127.0.0.1:2000 safe-restartSELENIUM
First, download and install Selenium server :
mkdir ~/SELENIUM
cd ~/SELENIUM
wget http://selenium.googlecode.com/files/selenium-server-standalone-2.3.0.jar

## Manage versions easily
ln -s selenium-server-standalone-2.3.0.jar selenium-server.jar
You need to have Xvfb installed on server :
sudo apt-get install xvfband run it in background :
/usr/bin/Xvfb :99 -ac -screen 0 1024x768x8 &If you want more informations, you can go to this article.
To launch your Selenium PHPUnit tests, run the Selenium server :
java -jar ~/SELENIUM/selenium-server.jar -port 4445 -ensureCleanSession -browserSessionReuse -purgecachesA basic Selenium test in PHPUnit format :
<?php

class Example extends PHPUnit_Extensions_SeleniumTestCase
{
  protected function setUp()
  {
    $this->setHost("127.0.0.1");
    $this->setPort(4445);
    $this->setBrowser("*chrome");
    $this->setBrowserUrl("https://github.com/");
  }

  public function testMyTestCase()
  {
    $this->open("/");
    $this->click("link=Search");
    $this->waitForPageToLoad("30000");
    $this->type("name=q", "drupal");
    $this->click("css=button.classy");
    $this->waitForPageToLoad("30000");
    $this->verifyTextPresent("drupal / drupal");
  }
}
You can run this Selenium test with PHPUnit :
phpunit tests/selenium/phpunit/ExampleSelenium and Jenkins
In your Jenkins job configuration, add this script task to run :
export DISPLAY=":99" && phpunit --log-junit=$WORKSPACE/tests/selenium/logs/selenium.xml --coverage-html=$WORKSPACE/tests/selenium/logs $WORKSPACE/tests/selenium/phpunit/AllTests.phpFinally, add a post-build action to publish "JUnit publish tests" to tests/selenium/logs/selenium.xml
Launch the job and voila !
CONTACT
Feel free to contact me on github for more informations or fork it !